


Simple Throw On Robe Instructions!
How to make an easy throw on robe to show off that gorgeous fabric.

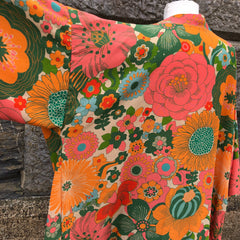
I absolutely loved this Fabric Godmother Viscose Crepe when it came in yesterday, so I had to whisk something up.
However, don’t be fooled when people say this only took me an hour! I am not one of those sewers, I always wish it only took me an hour, but I am just not that speedy when it comes to sewing.
To sew this up and cut out I would say it took me 2.5 hours.
I kind of made this up along with looking at a friend’s shop bought one and letting the fabric dictate the size. I didn’t want to use too much for this fabric as I knew it would be popular, so I used 1.5m.


I mocked up a paper template to give me a guide, this measured 33cm wide by 1m, one side of this with a neck hole cut out measuring 5cm x 12 cm with a curve. On the other side on the bottom I drew and folded back a triangle cut out. 11.5cm x 38 cm down, this was for the front panels.

I cut out my pieces, the back piece with the neck cut out was to be cut on the fold and the front panels were to be cut on the selvedge edge so you would have two separate pieces.
I then used the extra 50 cm for my sleeves and neck band.
Sleeves were cut 30 cm by 73 cm x 2
Neck band 10 cm x 130 cm x 2.
Using a 1.5 cm seam allowance throughout unless stated. I started with the two shoulders, front two panels sewn to the back panel right sides together and overlocked the edge. (you could just zigzag this instead if you don’t have an overlocker)

Then fold the longest side of the sleeves in half, mark the halfway point. Place the right sides together of the main body with the sleeve, line up the mark with your shoulder seam, pin along your sleeve matching raw edges with top part of front section and top part of back section. Sew and finish edge. Repeat on other side.

Pin and line up under arm and hem and sew from end of sleeve all the way to hem in one go. Finish edge and repeat on other side.

Hem sleeves and bottom hem by however much you would like, maker a bigger hem if you want in shorter etc.

Attach the neck band. Sew two short ends of the neckband together and press seam open. Fold the long edges wrong sides together and press, so you have a very long strip measuring 5 cm. Fold in each short end by 1.5 cm and press sew up this edge with an edge stitch, this will be the bottom hem of your robe.
With right side together match up the seam of your strip with the centre back of your robe, pin the bottom edge in place and then pin all the way round matching up your raw edges of your strip to the raw edges of the robe.
Sew all the way round using a 1 cm seam allowance finish seam. Press seam into the top away from the neckband, top stitch all the way round sewing down your seam allowance.

Tada! You now have your fabulous robe, feel glam around the house or wear with your favourite jeans and top to show off your skills and fabric.


Bought this amazing fabric from your shop the other day and am just going to start cutting out the pattern pieces right now…
The plan is to wear it this coming weekend for my son’s wedding! No Pressure!! Will let you know how it turns out…
:)
This fabric is wonderful and the blog inspired. 💕
Leave a comment